I spy, a multitude of eyes

It’s so tempting to see the proliferation of drones as a linear progression of sci-fi predictions, and on the surface of it it’s not difficult to imagine that drones will be as omnipresent as CCTV cameras, but what is lacking in that image is how it feels to live under such conditions. We can get a certain notion of the feeling by reading reports from war zones. There, drones are a constant presence with utterly opaque behaviour and motivations which causes enormous stress on everyone, since you never know if you’re being observed or potentially targeted for a killing, Or if you’re neighbour is.

In a non-military settings, I imagine that one might develop a habit of not looking into the sky as often, lest you be reminded of something looking back.

So this weeks project is an idea concocted in mirth but earnest in intent. “Ha ha only serious” as it were. Over beers I and Gabriel started laughing over my suggestion of a paraphrase of the “SOS Racisme” badge, which in Swedish had the text “Rör inte min kompis!” – “Don’t touch my friend!” I proposed a version for our modern times, adapted to the surveillance state as it’s embodied through drones. The text invents a new Swedish verb, and translates loosely to “don’t drone my friend!” Behold:

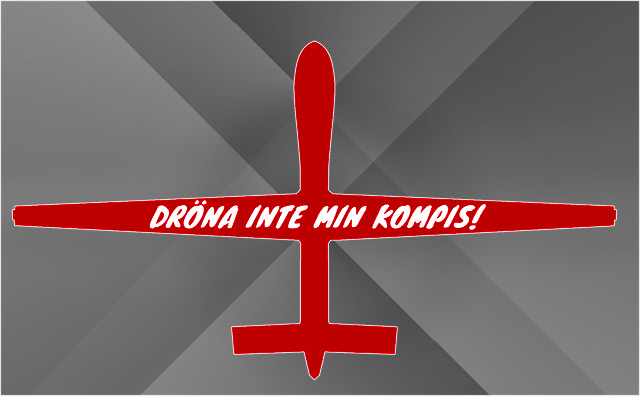
What the verb “dröna” in this sentence means could refer to raising awareness of the ubiquitous drone killings, as well as the panopticon-like surveillance they’re a part of, or perhaps it’s an appeal: —Friend, don’t drone! The enamel pin will be slightly wider than 5 centimeters, and depending on the colours I can get I’m leaning towards the red-cross red in the image above. Once they’re manufactured I’ll probably setup a subdomain and sell those, or something. What does one do with 200 pins anyway? I’m open for suggestions.

I’ve sent off requests to three manufacturers to get a quote on production, and this is my first venture into ordering to spec through alibaba.com, which is an OEM broker dealing mostly with Chinese manufacturers. Seeing as artists are supposed to be free agents in a free market, this way my Factory is an actual factory. It’s an odd world.

Strictly speaking, this project doesn’t fulfil the “finish by Sunday evening” criteria I set up last week since I don’t have the pins yet. But in my mind it’s finished enough that I can let it go; there’s nothing in the project awaiting my input until I get the quotes and technical specifications on how to deliver the original model. It’s happening, so I’ll count this as a partial success as far as my work ethic goes, awaiting the results once the pins are done and delivered. Their distribution will most likely bloat into a project of it’s own.

Regardless, next week there’ll be another project, perhaps more modest in scale…

Our ancestors could spot natural predators from far by their silhouettes. Are we equally aware of the predators in the present-day? […] This document contains the silhouettes of the most common drone species used today and in the near future. Each indicating nationality and whether they are used for surveillance only or for deadly force. All drones are drawn in scale for size indication. From the smallest consumer drones measuring less than 1 meter, up to the Global Hawk measuring 39,9 meter in length.

→ Drone Survival Watch: Twenty-first century birdwatching

Welcome to Global Drones Watch. The purpose of this site is to provide useful information about drones, and to encourage people to become active in efforts to stop killer drones overseas and stop domestic drones from violating our privacy and safety.

→ Global Drones Watch: Welcome to Global Drones Watch!

In the United States, the dominant narrative about the use of drones in Pakistan is of a surgically precise and effective tool that makes the US safer by enabling “targeted killing” of terrorists, with minimal downsides or collateral impacts. This narrative is false.[…] Based on extensive interviews with Pakistanis living in the regions directly affected, as well as humanitarian and medical workers, this report provides new and firsthand testimony about the negative impacts US policies are having on the civilians living under drones.

→ Stanfort/NYU Report: Living under drones

Schmitt saw with prescient clarity that air war would not only create an “intensification of the technical means of destruction” and the “disorientation of space,” but also intensify the problem of unequal sides, and allow the dominant side to re-label enemies as criminals. Schmitt understood that air power would create a world in which those who command the sky could police and punish those who do not.

→ Boston Review, Nasser Hussain: The sound of terror: Phenomenology of a drone strike

The drones were terrifying. From the ground, it is impossible to determine who or what they are tracking as they circle overhead. The buzz of a distant propeller is a constant reminder of imminent death. Drones fire missiles that travel faster than the speed of sound. A drone’s victim never hears the missile that kills him.

→ Reuters Magazine, David Rohde: The drone wars

“I arrived to the site and there were bodies scattered all over the place. The people told me that my son Aref had died.” When he returned to the village, Al Shafe-ee was quoted as saying, “I saw the women of the village gathered crying and screaming.”

→ NBC News, Michael Isikoff: US investigates Yemenis charge that drone strike “turned wedding into a funeral”

“After an engagement, we have to conduct surveillance for quite a long time. Yes, we may only be seeing it, but sometimes, we’re seeing it for hours on end, and that is part of the traumatic impact of the mission. It’s a definite form of stress on the operator in and of itself.”

→ Live science, Denise Chow: Drone Wars: Pilots reveal debilitating stress beyond virtual battlefield

“Gorgon Stare will be looking at a whole city, so there will be no way for the adversary to know what we’re looking at, and we can see everything.”

→ Washington post, Ellen Nakashima: With air forces Gorgon Drone ‘we can se everything’

“[Depicted on the shield of Agamemnon:] And he took up the man-enclosing elaborate stark shield, a thing of splendour. There were ten circles of bronze upon it, and set about it were twenty knobs of tin, pale-shining, and in the very centre another knob of dark cobalt. And circled in the midst of all was the blank-eyed face of the Gorgo with her stare of horror, and Deimos (Fear) was inscribed upon it, and Phobos (Terror).”

→ The Iliad, Homer: The gorgeneion, image of terror

Another part of the arsenal are drones that will be, for the first time, monitoring the Games from above, as well as robotic bomb detectors that will prowl the Olympic grounds below.[…]”You can’t use drones to prevent suicide bombers … But they’re very good things to prevent [protests] because it might spot people trying to gather.”

→ CBC, Nahlah Ayed: Russia’s olympic security to set new surveillance standard at Sochi

If you’re going to develop secret airplanes, you’re going to need to figure out how to fund them. Now, how do you fund an airplane in secret when the constitution states that all federal funding needs to be accounted for? The point being that there are enormous economic, social and political infrastructures that need to be in place to create and sustain something like classified flight testing. Over time, when you build these types of infrastructures, you end up developing a state within the state that has very different rules and different ways of operating than what we would think of as a kind of democratic state.

→ Center for the study of the drone, Lenny Simon: Interview: Trevor Paglen

I like to think
(it has to be!)
of a cybernetic ecology
where we are free of our labors
and joined back to nature,
returned to our mammal
brothers and sisters,
and all watched over
by machines of loving grace.

→ Richard Brautigan: All watched over by machines of loving grace

Doing the RepRap #5 — The fun of frying

Good god damn goat balls.

I finally got the bootloader onto the ATMega — thanks to a lot of trial and error and handwringing and help from ethereal beings on the Internets and KKV, and with the motors and Pololus installed I hook the PSU into the board and the LEDs are shining and — wait a minute, isn’t the processor a teensy bit too hot? Oh, let’s touch it — well whaddayaknow, it’s blistering my finger, how peculiar!

As it turns out, I’ve soldered the Molex connector the wrong way around, so am feeding 5V to where I need 12V and vice versa. Which means some components are now fucked, possibly including the ATMega. I guess I ought to be grateful that none of the capacitors blew up in my face, but right now I’m just going to bed.

Below are some helpful links left for future reference

I found a good description for what the bootloading process is about here: http://smileymicros.com/blog/2011/03/04/busy-as-a-beavratmega644-on-a-breadboard/

Resources on what AVR’s are: http://www.evilmadscientist.com/article.php/avrstuff

A tutorial on what AVR programming is about, somewhat technical: http://www.ladyada.net/learn/avr/

Using the AVR ISP MkII as a programmer to bootload ATMegas. Relevant if I get me the programmer, but can give inside into the process: http://www.arduino.cc/playground/Code/OSXISPMKII

Crosspack is a complete AVR developing package, not sure how to implement the homebrewn boards there, but the bootloaders should be more or less generic, right? http://www.obdev.at/products/crosspack/index-de.html

Wormfood has a baud to Mhz calculator here, which I’m sure is good for something down the line: www.wormfood.net

A thread started in 2006 about the process of getting the Arduino to act as an ISP, which I never succeeded in doing: Turn Arduino into an ISP programmer

The schematics for my model of Arduino, the old NG, are here: arduino_NG_schematic.png and there’s a description of most of the parts and ports here: www.arduino.cc

I’m not sure of what this page does but it seems handy: http://www.sengpielaudio.com/calculator-ohm.htm

Doing the RepRap #4 — the art of failing on a small scale

As a preface to this post, let me reiterate that I’m doing this writeup so that people in a similar position as I might benefit from my mistakes and experiences. I’m learning all of this as I go, and imagine that anyone somewhat dedicated but with no prior experience might run into the same conceptual problems as I. The past week has proven that reasoning ab initio is all good and well if you actually know the “initio” part. My ignorance of physics and maths leave me with little but a smidgen of formal logic to draw any conclusions from electric schematics, and that’s really not helpful when it comes to burning a blasted bootloader onto a gosh darned ATMega644 20PU.

As the saying goes: When the only tool you have is a hammer, everything looks like a nail. And right now I feel as if I have one of those oversized blow-up hammers, banging away at the problems like a drooling cretin.

Let’s start with what I’ve actually accomplished. I’ve scavenged a small computer fan and a 300W power supply, which made me feel all dumpster diving and glowing. Not sure if the PSU is enough to drive the heated bed alongside everything else, but it’s a start. I ordered and received four Pololus A4988 to control the five hybrid stepper motors (1.8°, 1200mA, 4V, 3.17kg holding torque) from Wetterott I also ordered

UPS didn’t bother to ring me when they where outside my door, so I had to bike for an hour to get the package; Apparently “courier” is Latin for “duuuur I’m driving around with your stuff.”

The Pololus are not the kosher ones, but according to spec they are almost the same as the recommended A4983, and can be used as “drop in replacements,” which remains to be seen. The holding torque of the motors might be too low to use for the extruder, but fine for everything else; worst case, I’ll get a stronger NEMA 17 sized motor for the extruder.

I also got the TTL-232R USB-to-serial-cable, which I thought would be enough to get the bootloader onto the ATMega 644 20PU. It turns out it’s good for controlling the final motherboard, but not burning the actual bootloader. I’ll get to that.

A couple of days ago Magnus over at KKV Elektronen brought his MakerBot over for a demonstration. It was swell to finally see a 3D printer in action, and I got a tiny teensy part for my RepRap printed. In the upcoming days I’m hoping to get the rest done, and I’ve found a local source for most, if not all of the metal parts. Hornbach turns out to have a large enough selection of washers and bolts and whatnuts to probably cover everything I need except the springs. I got threaded rods and unthreaded rods, at a fraction of the price I’d pay at Järnia, so I’ve scrapped the plans on getting it all as a kit from UK as the postage was prohibitive.

Perhaps it’s because I’m an anxious person, but it feels reassuring when I actually make the decision that what I have listed on the printout is the same thing which I hold in my hand, and put it into the shopping basket. It’s such a banal thing, but it took me a good five minutes before feeling sure that the “M8 fender washer” I was holding was similar enough to the one described.

Once I had the Pololus I figured I would upload the bootloader and try to see if I could get the motors to spin. Piece of cake, no? Well, not really, as my desperate post over at the RepRap forums indicate.

The problem, as Traumflug points out in the above post, is that I have wired the whole thing wrong. I’m using the USB-to-serial cable, where I ought to use a programmer hooked into the six smaller pins on CONN6. I don’t have the programmer in the image he links, but find information to on how to use an Arduino microcontroller as a programmer instead; Arduino ISP – In-System Programmer.

I find one page on Instructables which seems to solve my problem: Using your Arduino ISP: Burning a bootloader. I set up the ATMega on a breadboard and hook it into my Macbook. At first, I get “USB pulling too much power” warnings, but that’s cause I hadn’t doublechecked my breadboard and was actually shorting the USB-port. Did you know that shorting your USB port can kill your wifi? Oopsie.

The only difference from the Instructable page is that I use the hardware files for the Gen7 electronics instead of the Sanguino. The option to use my board with my processor shows up under Tools>board so all is fine there.

I run “burn bootloader” with “Arduino as ISP” but get a timeout. So I try the other bootloader options and get the same thing. Doublechecking the processor I have the correct one set, so it’s not that. The Arduino works and runs other applications with no complaints. Searching the Arduino website I find Using Arduino as AVR ISP, which tells me that I need to upload a special sketch (Arduino application) called ArduinoISP to the microcontroller before using it as a programmer. That takes with no problem (I’m using the Arduino NG, and if you’re following along then don’t forget to hit the reset button before sending a new sketch to the Arduino)

I run Tools>burn bootloader>Arduino as ISP and get the error

avrdude: Yikes! Invalid device signature. Double check connections and try again, or use -F to override this check.

And running Tools>burn bootloader>AVR ISP gives:

avrdude: stk500_recv(): programmer is not responding
avrdude: stk500_disable(): protocol error, expect=0x14, resp=0xe0

Using the Arduino IDE for the bootloader isn’t supported in the official wiki, but Kliment over in the #RepRap channel mentions that starting the Arduino IDE as root allows him to use it to burn the bootloader. I get the same result regardless. Following the instructions for Linux terminal (bash) gives me balls, probably because the syntax differs from OSX — I’m going to check this out tomorrow.

According to the datasheet of ATMega 644, the voltage is ok, and the current shouldn’t be higher than 200mA over the pins 10-11 and 30-31, which they aren’t. I’m clearly missing something. I log into the #AVR channel on IRC and get a short description of what a bootloader is and that one can burn those in serial and parallell mode. What I’m trying to do is apparently “parallell mode” which is all fine and well but doesn’t get me closer to an answer.

I take a look at the top of the in-line documentation of the Arduino IDE sketch, and see this:

// this sketch turns the Arduino into a AVRISP
// using the following pins:
// 10: slave reset
// 11: MOSI
// 12: MISO
// 13: SCK

I realise that those are the same names that are listed on the Gen7 1.2 schematic as COMM6. Hosianna, perhaps my prayers are answered and problem solved. I drop the ATMega into its slot on my Gen7 board, and hook up the COMM6 to the Arduino. With much the same result as on the breadboard. Cockbucket!

The day before Traumflug has mentioned that using the Arduino IDE doesn’t work cause it’s communicating too fast for the ATMega to keep up. It’s set to 1Mhz as default, but should go up to 8Mhz after a fuse has been burned on the chip. I have no clear grasp of what the Mhz denotes or how that relates to the speed of communications, but it seems critical. From computers in general, I’m guessing 1 Mhz means 1 million computations per second, but what it does to what is just beyond me. I know that I need to slow down somewhere, but not certain if I can do this in software or need to add crystals to the breadboard as per the description here and at the bottom of this page?

Default baud-rate for the Arduino IDE is 115200, which supposedly is okeydokey for a 16 Mhz chip, so perhaps I should just divide that into 16 and that might work? Can you see before your inner eye the magic chicken I’m waving above my workbench? I’m basically down to numerology here.

Regardless of how much I enjoy sailing the seas of doing new shit, whatever leaky vessel I’m in is currently waterlogged and I’m beginning to eye alternative options. As in getting a pre-programmed ATMega. It seems a shame to give in, having sacrificed brain cells and pulled hairs on the altar of geekdom, but perhaps I ought to choose my battles more wisely and forfeit this one to the processor. It does sting to be bested by an inert piece of plastic and metal on my kitchen table, but what the hell, if I can’t get it solved this week I’ll just buy a replacement. And program this chip with a brick. So it goes. Back into the fray, Smashy smashy.

Doing the RepRap #3

I’ve successfully drilled and soldered both the Gen7 v1.2 motherboard and optostops.

Redundancy is king so I made nine optostops, two of which seem broken — they light up regardless if you apply current. People in the forums helped me troubleshoot, but having confirmed that the sensors work (i.e. infinite resistance when the optos are blocked) I can’t find anything wrong with them.

What is more worrisome is that I haven’t yet tested the motherboard for shorts and whatnot; If I can mess up a 15-solder board, surely a 400-solder one is going to explode. This might be exiting; If my apartment burns down in the process, I’m crying force majeure and buying it finished, like most people seem to.

[x_video_embed no_container=”true”][/x_video_embed]

What is remaining is everything else. I need to get all the metal parts — nuts bolts and washers — and don’t really know where to order them here in Sweden. I’m tempted to order from McMaster-Carr only because they have such a well designed site it makes me all weepy.

Hopefully, I’ll get my hands on the printed parts along with an extruder — Wade’s geared extruder — later this week when we’re going to play around with a MakerBot at KKV Elektronen, printing the boards with components at some point; It’ll be great to finally get a look at a 3D printer in action, and get a hang of the software to run it.

Speaking of which, I have to load the bootloader onto the ATMega 644-20 PU, and hope to use an old Arduino I have laying around somewhere. Sounds simple, but this would also require me to get a power supply for the rig. (12V pushing 15Amps should do it. The machine only requires 5Amps, but the heated bed requires an additional 8Amps, so there you go.) The power supply needs to be hooked up to the board, as does the Arduino, so I need to figure out what cables to use and make those, after which I get to hook computer to Arduino and let it do it’s programming magic.

The optostops need to have flags made for them, preferably out of soda cans, so that the stops can be engaged for calibration and safety. I need a couple of 5mm wide belts to drive the extruder and bed, and I can either buy them directly or split them myself from more standard widths. Having chosen to go with Wades extruder, I need to manufacture or buy a hot-end, the part of the printer where the plastic poops out, as well as the hot-bed onto which the pooping will happen. So tonight is “ordering shit online” night. That, and crying into a bottle.

So far, this has been a crash course in electronics, and the fact that I haven’t yet been electrocuted or blown a fuse is encouraging. I can almost feel my neural pathways adapt to all these Ohms, Amps and whatnots, and it’s nice to learn something new again.

Doing the RepRap #2

Perhaps it’s the colder weather or perhaps the glass fibers I’ve inhaled are tickling my hypothalamus, but today I woke up early with the minimum of suicidal thoughts and have gotten a lot of stuff done. And it’s not even noon!

Most importantly, I’ve gotten around to ordering all the electronic component and connectors needed to finish the Gen7 1.2 motherboard and optostops. When envisioning the project, I was determined to bond with ELFA, to find a weary comrade at the store who would regale me with tales of how she set fires on things in her first project as well, and I would offhandedly follow the advice and recommendations for what to buy. Then I realised that ELFA is up to three times as expensive as some of the net stores, so screw that.

Last night I was up with a bottle of wine and a Dremel, trying to drill really fucking teensy holes in the PCBs. I was wearing a mask most of the time, but some of the glass fiber is bound to end up in my brain. Considering I’m doing this in the kitchen, let’s call it additional roughage. The drilling went well, and I managed to substitute the smallest drill bit with the conical diamond bit. I thought I would need a press drill for precision, seeing as the smallest holes are half a millimeter or so, but as long as you limit yourself to two glasses of wine you’re good. At three glasses you become a bit cavalier re:precision.

The parts I ordered were mostly from Reichelt with some remaining stuff from RS Components. Reichelt has a nice webstore with pretty pictures and all, but their customer service is either shy or enjoys receiving multiple emails with similar questions. Most businessess, I imagine, upon receiving an email asking “can I pay with Mastercard or do I pay on delivery?” would answer both parts of the sentence, not limiting themselves to “You cannot pay with Mastercard.” Playing coy might be a good way of wooing the shy guy with a beret, but I’m trying to pay for your services so no need to beat around the bush here.

Before I got to the stage of drilling holes and ordering parts, let me tell you the story of how I learned of which parts to order. I believe it’s telling of how quickly one gets mired in tracking down information when you know as little as I do on a topic.

In order to make the PCB I had to find a list of the required parts to mount on the PCB. I couldn’t find anyone who could tell me what parts are required. I couldn’t find a written list of parts, but there were instructions somewhere on the wiki telling me to open up a file of a certain type, changing a setting in an application, and then export a BOM — Bill Of Materials. No hint of what the file name is nor what application is required, but OK.

So I go onto the #reprap IRC channel and ask my stupid questions and get very little response. Someone recommends that I check out gEDA PCB, an open source application for creating PCBs and schematics, because EAGLE might not be able to open the file I need to open, whichever file that is. GEDA is actually mentioned on the wiki, but there’s no information as to what it is or where to get it, so I thought it was a filetype at first.

I check out gEDAs homepage, which tells me that I need to compile the application from source. Ok, so poke about a bit then realise that gEDA requires FINK to install, which in turn requires installing FINK and dependencies via the Terminal, which I’m shamefaced to admit I suck at using. FINK requires the Xcode developer tools, so I leave that to download for half an hour and then have the Devtools install running in the background while I try to get a feel for the RepRap IRC community.

Among the running chatter of people troubleshooting their machines, there was some discussion about the first case of 3D fabbing copyright infringement, when someone recreated a prop from a Paramount movie and they got on his case. It’s surely a sign of things to come, but as long as there are open source 3D apps and DIY printers, I don’t see how you could stem the tide of personal infringement. It’s a short read and worth checking out:

→ Torrentfreak, enigmax: Paramount Cease and Desist Targets 3D Printer ‘Pirate’

Anyway, with the Xcode developer tools installed, I notice that FINK isn’t available as a binary for 10.6, so I download a tarball and follow the instructions for compiling FINK using the Bash Terminal. Compiling FINK has actually been the most straightforward thing I’ve done so far, as the installation was really friendly and considerate; Like a well lubed proctologist with good blood circulation.

It took me a moment to realise that I need to enable unstable packages in FINK, after which gEDA installed fine while I fell back on default selections when asked about plugins and whatnot. I’m not sure if I screwed something up in the process, cause gEDA took two hours to compile even though I had engaged all eight cores.

With gEDA installed, I find the PCB app in ~/sw/bin/pcb and open up the Gen7Board.pcb file from the app. And lo and behold, there’s a “BOM” alternative under “Export…” which gives me a list of components and their place on the board. All in a text-file which you have to manually open cause it has no filetype extension. Looking over the list of parts, I’m still confused since some of the parts are labelled “unknown” which is somewhat ominous. In the chat, Traumflag himself shows up (The guy who created and maintains Gen7 1.2) and I ask my silly questions again.

Turns out, there’s a complete parts list on the wiki, and he promptly sends me a link.

Now. When you’re as green as I am on a subject, it can be difficult for an outside observer to distinguish me from a lazy bum, but I swear I’ve gone up and down that fucking wiki and not found any links to a parts list for the Gen7 1.2 board. Apparently, Google can’t find any pages linking to it either (as of July 1st at least) so perhaps there aren’t any. I don’t know how it’s possible not to link internally somewhere on a wiki, but at least it made me feel less stupid, albeit still frustrated.

In grassroots open source project such as the RepRap community, writing documentation is boring and little value seems attributed to it and consequently little work is done on it; On the other hand, it’s really simple to get in touch with whomever designed the part you need help with, and people are often kind and willing to lend a hand.

So, with a followup email from Traumflag, I had a complete list of parts. And since the wiki contained direct store links to the components, I took the sensible approach and ordered the goddamn parts already. Though Reichelt slapped on some banking fee, the parts were most certainly cheaper than ELFA; And even if I could have tried to source cheaper components, that would have taken me a couple more days, which I rather spend solving the next problem down the road. Which I predict there will be aplenty.