Doing the RepRap #14: Updates and upgrades

Here’s something that I didn’t think about. I had skipping on extruder as well as Y & X, but hadn’t thought that the pulley grub screw needed a flat surface to press against. Here I was thinking that the heat was melting the inner bore and allowing slippage (which might still be happening) but filing the motor shafts flat hadn’t occurred to me. Lucky me there’s an instructional video on the process, which seems straightforward enough.

→ Filing flat a motor shaft: http://www.youtube.com/watch?v=DBnKPEnt9a4

Regardless, I’m still getting metal pulleys, and having looked at how coarse the T5 belt is and how it’s jumping on my printed pulleys, I’m probably moving to T2.5 belts. Now if I could only find a local source of the stuff which didn’t cost a fortune, I’d be set. On IRC I spoke with some guy in Poland who was buying and shipping the stuff, but couldn’t get a quote from him. And the pulleys had to be hand drilled, which seems a bother if there are pre-drilled ones available. Suggestions are welcome; the ones I’ve found so far seem too expensive for what it is, I mean, how much can diecasting pulleys cost?

Someone is starting to assemble a guide for beginners into the art and magic of building a RepRap, and it’s off to a good start. If you want an overview of the build process, check out reprapbook.appspot.com. I wish that page had been live when I started out, but you know what? Back then we didn’t have fancy e-books but read the wiki and begged in chats, and we would count ourselves lucky!

Doing the RepRap #13 — Printer finished

It’s been a long road, but my Reprap Mendel Prusa 3D printer is finished and I’m printing stuff. There have been so many problems and fuckups along the way, that when I finally started printing stuff a week ago I didn’t think much of it, but with hindsight it was a Grand Moment™. I’ve joined the ranks of 3D printers. You may now commence the “oohing” and “aahing” I understand are my dues.

So far, with the exception of a frog and a replacement LM8UU Y axis holder, I’ve mostly been printing calibration cubes. These are shapes intended to troubleshoot your printer and give you an opportunity to get your Skeinforge/Sfact setting correct. As you can hear in the video there’s some rattling going on on the Z-axis, and I have some trouble with Y-alignment on some prints, but with lowered acceleration on Z and Y, and perhaps tightening of the belt on the latter, I think I’ll be able to print halfway decent parts.

Sara came over for a few days, and as any good boyfriend I set about making her feel comfortable helping out with the build. It was much appreciated as it often seems I have three hands too few to get something assembled. Making the print bed was slow going, and as I’m using plexiglass for print surface we broke off a couple of pieces before getting a more-or-less square one. The plexi is actually good for printing on cold, at least once the PLA starts sticking to it, but if your hotend gets too close the PLA fuses with the surface, and you’ll inadvertently run the head through the board which will create pockmarks in the surface, and possibly plug your nozzle with plexi — which is the reason I’m printing with the 0.5mm nozzle instead of the 0.35 I started with.

[x_video_embed no_container=”true”][/x_video_embed]

We were leveling the print table for a good two hours, and found that the design with springs between the lower and print bed wasn’t optimal, since the springs were unevenly springy. I had bought a whole kit with the suckers but none seem to fit well enough and give enough force to work. It’s a good design on paper, but we found that it was just easier to use two sets of nuts per fastener bolt. Protip: Get spanners which fit instead of fiddling with adjustable ones or pliers; it’ll save you so much time and temperament it’s worth the expense.

At this moment thanks might be in order. A great amount of those go out to Traumflug for design and massive help with the electronics, and Kliment, Triffid_Hunter, Action68 and everybody else who’s been quick to lend support in #RepRap on IRC or on the reprap.org forums. When you’re as ignorant of a subject as I was about the RepRap, you rely on the help and input of friends and strangers, and without the support of everyone from awesome girlfriend Sara to KKV electro to that guy who barely spoke English but cut me some metal rods, this project might have fallen over and not gotten up after any of innumerable stumbles.

Of course, thanks to the people here in Turku for providing an incentive to start this, as well as the means and time to finish it. Ultimately, bigup to Adrian Bowyer for getting the RepRap project started, as well as all those who keep improving upon it. I have a public presentation of the project on Thursday 6th October at 1800 in Gallery Titanik in Turku, and if you’re nearby I’d love to see you there.

Doing the RepRap #10

Before you can print from your STL file you need to convert it to gcode. Think of it as Postscript for 3D-printers and 2D routers. The tool of choice for people working with RepRap has been Skeinforge, which has acquired tons of functionality at the expense of usability: It’s ugly as sin and has more features than are properly documented (or documented at all) so I’m happy to see that there are alternative versions cropping up, like SFACT.

Also, putting the printer together I ran into some issues with the otherwise excellent documentation put together by Gary Hodgeson, namely the parts using the LM8UU linear bearings instead of printed bushings. Because I don’t have any spare parts I’m terrified of messing up those I bought from Greg Frost (shipped all the way from Australia) so am anxiously browsing the RepRap wiki and forums in search of instructions. I’ve already managed to put the Y-motor bracket in every position possible, and finally had to email Greg to get a picture of how to do it properly. I’m documenting every step, but so far it’s more of a blooper reel…

I finally found an excellent description of how to fit all the parts together: How to build up a LM8UU Linear Bearing Prusa. It does exactly what it says on the tin, and with the exception that I’m going for a three bearing bottom plate, I ought to be able to finish the build in no time. Now, if I could only settle on which lubricant to use for the rods, I’d be set. “Light machine oil” or “PTFE spray” is the question.

————————————

Update from the comments. In the video below I’ve inserted the pins from the wrong side. The black plastic bits should go on the underside of the Polo, so that it’ll sit flush with the mounts. As it stands, the Polos work for me soldered this way as well, but it’s more finicky and there’s a risk that you’ll have too much solder left and won’t be able to push the pins far enough into the mounts.

[x_video_embed no_container=”true”][/x_video_embed]

Doing the RepRap #7

It’s been a busy couple of weeks here at HQ, consisting mostly of me troubleshooting my Gen7 1.2 board in the forums and on IRC. You can read of my ordeals under the title “Getting movement with Teacup + Gen7 1.2” and my aborted attempts at troubleshooting the (probably dead) Pololus is here: How to check if A4988 is fried?

Finally, Traumflug offered to take a look at the board if I could send it to Germany. I dropped it in a mailbox quicker than you can say “Spitze!” and worried my head about getting a multimeter which wouldn’t give me random readings instead. A couple of days later I got an email back which opened with:

Your board arrived today. It took me something like a minute to find the bridge … :-) See the attached picture.

Which at once had me feeling happy that it’s solved, and rather dull for not having spottet the short. I actually got a small microscope and went over the board to find shorts, but I ignored the areas easily visible by the naked eye… Since I have very little dignity left to salvage I’m taking this in stride and the board is on it’s way to Turku, where I’ll assembly the 3D printer. Shouldn’t take more than a day or so, right? What could go wrong?

Speaking of being on it’s way to Turku: I’m writing this at Landvetter airport — amongst screaming children and the smell of fear which is probably I — and my plane leaves in a while. I’m drinking expensive beer and hoping that my luggage is under the weight limit. Seeing as this is my first residency, I’m looking forwards to having a change of scenery and a deadline for the project. Although these open-ended processess are all good and fun, actually setting print to paper — or plastic to Turku, as it were — will feel nice.

As for the multimeter, at first I got the Fluke 115 — all the reviews list Fluke as the doubleplusbest — but switched to an Agilent U1242B after watching the one hour “multimeter buying guide” with David Jones over at the EEV blog (it gets better once you get used to his voice. Your ears take five six hours to adapt, in my experience). The deciding factor was that the Agilent had μA while the Fluke only did mA — I’m not good enough at these things to know when I’ll be using what, but will take others word for it. Also, the Agilent can use temperature probes which might be handy if I’m calibrating the Makergear hotend or the heated bed.

Ok, enough with this light banter. Off I go.

Doing the RepRap #6 — repair, rebuild, rejoice, despair.

In anticipation of fucking shit up I had ordered two ATMegas and having succeeded once it took me one try to get the bootloader to take this time around. The board looked fine, but after a lot of trial and error, error, and error, I resigned to the fact that my Pololus probably were fried and ordered new ones. And that, kids, is how you literally burn 600 SEK by being a lazy bum and not double-checking your solders. Lesson learned and so on.

Having received the new Pololus, and with an extruder underway from the States and the plastic parts coming over from Australia, I only need to get the motors to spin to have a semblance of a printer up and running. I have most metal parts except for some springs and wingnuts, and to celebrate the birthplace of the machine I got some SKF 608 bearings. Oh, and I still need two T5 timing belts.

In the IRC channel I was suggested to use Pronterface.py instead of ReplicatorG as a computer side controller of the board, but after the first few times I couldn’t get the thing to launch and reverted to ReplicatorG. Not that it matters at the moment, because even with the ATMega replaced and properly bootloaded and running Gen7 Teacup, I can’t get any readings or functions out of it. I made a video of my attempts and you can watch it below; it’s dry but you get to watch me prod an inanimate object with clumsy fingers.

[x_video_embed no_container=”true”][/x_video_embed]

Mom and Tomasz decided to visit now as well. I’ve shown them the archipelago and then my allotment garden and then the KKV workshop and then mom left and now Tomasz is stuck with me while I whine about the RepRap and hush him while recording troubleshooting videos. You can actually hear him in the video above, so it’s well worth watching for that alone! Also, I totally destroyed him at pingpong earlier today, and have video of that as well.

Doing the RepRap #5 — The fun of frying

Good god damn goat balls.

I finally got the bootloader onto the ATMega — thanks to a lot of trial and error and handwringing and help from ethereal beings on the Internets and KKV, and with the motors and Pololus installed I hook the PSU into the board and the LEDs are shining and — wait a minute, isn’t the processor a teensy bit too hot? Oh, let’s touch it — well whaddayaknow, it’s blistering my finger, how peculiar!

As it turns out, I’ve soldered the Molex connector the wrong way around, so am feeding 5V to where I need 12V and vice versa. Which means some components are now fucked, possibly including the ATMega. I guess I ought to be grateful that none of the capacitors blew up in my face, but right now I’m just going to bed.

Below are some helpful links left for future reference

I found a good description for what the bootloading process is about here: http://smileymicros.com/blog/2011/03/04/busy-as-a-beavratmega644-on-a-breadboard/

Resources on what AVR’s are: http://www.evilmadscientist.com/article.php/avrstuff

A tutorial on what AVR programming is about, somewhat technical: http://www.ladyada.net/learn/avr/

Using the AVR ISP MkII as a programmer to bootload ATMegas. Relevant if I get me the programmer, but can give inside into the process: http://www.arduino.cc/playground/Code/OSXISPMKII

Crosspack is a complete AVR developing package, not sure how to implement the homebrewn boards there, but the bootloaders should be more or less generic, right? http://www.obdev.at/products/crosspack/index-de.html

Wormfood has a baud to Mhz calculator here, which I’m sure is good for something down the line: www.wormfood.net

A thread started in 2006 about the process of getting the Arduino to act as an ISP, which I never succeeded in doing: Turn Arduino into an ISP programmer

The schematics for my model of Arduino, the old NG, are here: arduino_NG_schematic.png and there’s a description of most of the parts and ports here: www.arduino.cc

I’m not sure of what this page does but it seems handy: http://www.sengpielaudio.com/calculator-ohm.htm

Doing the RepRap #4 — the art of failing on a small scale

As a preface to this post, let me reiterate that I’m doing this writeup so that people in a similar position as I might benefit from my mistakes and experiences. I’m learning all of this as I go, and imagine that anyone somewhat dedicated but with no prior experience might run into the same conceptual problems as I. The past week has proven that reasoning ab initio is all good and well if you actually know the “initio” part. My ignorance of physics and maths leave me with little but a smidgen of formal logic to draw any conclusions from electric schematics, and that’s really not helpful when it comes to burning a blasted bootloader onto a gosh darned ATMega644 20PU.

As the saying goes: When the only tool you have is a hammer, everything looks like a nail. And right now I feel as if I have one of those oversized blow-up hammers, banging away at the problems like a drooling cretin.

Let’s start with what I’ve actually accomplished. I’ve scavenged a small computer fan and a 300W power supply, which made me feel all dumpster diving and glowing. Not sure if the PSU is enough to drive the heated bed alongside everything else, but it’s a start. I ordered and received four Pololus A4988 to control the five hybrid stepper motors (1.8°, 1200mA, 4V, 3.17kg holding torque) from Wetterott I also ordered

UPS didn’t bother to ring me when they where outside my door, so I had to bike for an hour to get the package; Apparently “courier” is Latin for “duuuur I’m driving around with your stuff.”

The Pololus are not the kosher ones, but according to spec they are almost the same as the recommended A4983, and can be used as “drop in replacements,” which remains to be seen. The holding torque of the motors might be too low to use for the extruder, but fine for everything else; worst case, I’ll get a stronger NEMA 17 sized motor for the extruder.

I also got the TTL-232R USB-to-serial-cable, which I thought would be enough to get the bootloader onto the ATMega 644 20PU. It turns out it’s good for controlling the final motherboard, but not burning the actual bootloader. I’ll get to that.

A couple of days ago Magnus over at KKV Elektronen brought his MakerBot over for a demonstration. It was swell to finally see a 3D printer in action, and I got a tiny teensy part for my RepRap printed. In the upcoming days I’m hoping to get the rest done, and I’ve found a local source for most, if not all of the metal parts. Hornbach turns out to have a large enough selection of washers and bolts and whatnuts to probably cover everything I need except the springs. I got threaded rods and unthreaded rods, at a fraction of the price I’d pay at Järnia, so I’ve scrapped the plans on getting it all as a kit from UK as the postage was prohibitive.

Perhaps it’s because I’m an anxious person, but it feels reassuring when I actually make the decision that what I have listed on the printout is the same thing which I hold in my hand, and put it into the shopping basket. It’s such a banal thing, but it took me a good five minutes before feeling sure that the “M8 fender washer” I was holding was similar enough to the one described.
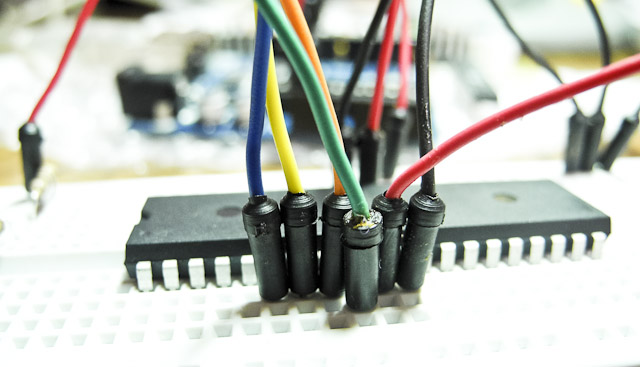
Once I had the Pololus I figured I would upload the bootloader and try to see if I could get the motors to spin. Piece of cake, no? Well, not really, as my desperate post over at the RepRap forums indicate.

The problem, as Traumflug points out in the above post, is that I have wired the whole thing wrong. I’m using the USB-to-serial cable, where I ought to use a programmer hooked into the six smaller pins on CONN6. I don’t have the programmer in the image he links, but find information to on how to use an Arduino microcontroller as a programmer instead; Arduino ISP – In-System Programmer.

I find one page on Instructables which seems to solve my problem: Using your Arduino ISP: Burning a bootloader. I set up the ATMega on a breadboard and hook it into my Macbook. At first, I get “USB pulling too much power” warnings, but that’s cause I hadn’t doublechecked my breadboard and was actually shorting the USB-port. Did you know that shorting your USB port can kill your wifi? Oopsie.

The only difference from the Instructable page is that I use the hardware files for the Gen7 electronics instead of the Sanguino. The option to use my board with my processor shows up under Tools>board so all is fine there.

I run “burn bootloader” with “Arduino as ISP” but get a timeout. So I try the other bootloader options and get the same thing. Doublechecking the processor I have the correct one set, so it’s not that. The Arduino works and runs other applications with no complaints. Searching the Arduino website I find Using Arduino as AVR ISP, which tells me that I need to upload a special sketch (Arduino application) called ArduinoISP to the microcontroller before using it as a programmer. That takes with no problem (I’m using the Arduino NG, and if you’re following along then don’t forget to hit the reset button before sending a new sketch to the Arduino)

I run Tools>burn bootloader>Arduino as ISP and get the error

avrdude: Yikes! Invalid device signature. Double check connections and try again, or use -F to override this check.

And running Tools>burn bootloader>AVR ISP gives:

avrdude: stk500_recv(): programmer is not responding
avrdude: stk500_disable(): protocol error, expect=0x14, resp=0xe0

Using the Arduino IDE for the bootloader isn’t supported in the official wiki, but Kliment over in the #RepRap channel mentions that starting the Arduino IDE as root allows him to use it to burn the bootloader. I get the same result regardless. Following the instructions for Linux terminal (bash) gives me balls, probably because the syntax differs from OSX — I’m going to check this out tomorrow.

According to the datasheet of ATMega 644, the voltage is ok, and the current shouldn’t be higher than 200mA over the pins 10-11 and 30-31, which they aren’t. I’m clearly missing something. I log into the #AVR channel on IRC and get a short description of what a bootloader is and that one can burn those in serial and parallell mode. What I’m trying to do is apparently “parallell mode” which is all fine and well but doesn’t get me closer to an answer.

I take a look at the top of the in-line documentation of the Arduino IDE sketch, and see this:

// this sketch turns the Arduino into a AVRISP
// using the following pins:
// 10: slave reset
// 11: MOSI
// 12: MISO
// 13: SCK

I realise that those are the same names that are listed on the Gen7 1.2 schematic as COMM6. Hosianna, perhaps my prayers are answered and problem solved. I drop the ATMega into its slot on my Gen7 board, and hook up the COMM6 to the Arduino. With much the same result as on the breadboard. Cockbucket!
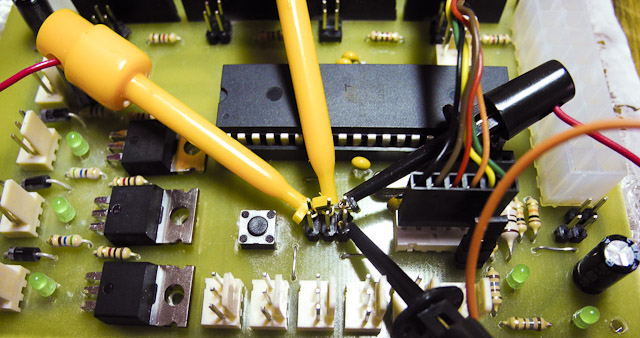
The day before Traumflug has mentioned that using the Arduino IDE doesn’t work cause it’s communicating too fast for the ATMega to keep up. It’s set to 1Mhz as default, but should go up to 8Mhz after a fuse has been burned on the chip. I have no clear grasp of what the Mhz denotes or how that relates to the speed of communications, but it seems critical. From computers in general, I’m guessing 1 Mhz means 1 million computations per second, but what it does to what is just beyond me. I know that I need to slow down somewhere, but not certain if I can do this in software or need to add crystals to the breadboard as per the description here and at the bottom of this page?

Default baud-rate for the Arduino IDE is 115200, which supposedly is okeydokey for a 16 Mhz chip, so perhaps I should just divide that into 16 and that might work? Can you see before your inner eye the magic chicken I’m waving above my workbench? I’m basically down to numerology here.

Regardless of how much I enjoy sailing the seas of doing new shit, whatever leaky vessel I’m in is currently waterlogged and I’m beginning to eye alternative options. As in getting a pre-programmed ATMega. It seems a shame to give in, having sacrificed brain cells and pulled hairs on the altar of geekdom, but perhaps I ought to choose my battles more wisely and forfeit this one to the processor. It does sting to be bested by an inert piece of plastic and metal on my kitchen table, but what the hell, if I can’t get it solved this week I’ll just buy a replacement. And program this chip with a brick. So it goes. Back into the fray, Smashy smashy.

Doing the RepRap #3

I’ve successfully drilled and soldered both the Gen7 v1.2 motherboard and optostops.

Redundancy is king so I made nine optostops, two of which seem broken — they light up regardless if you apply current. People in the forums helped me troubleshoot, but having confirmed that the sensors work (i.e. infinite resistance when the optos are blocked) I can’t find anything wrong with them.

What is more worrisome is that I haven’t yet tested the motherboard for shorts and whatnot; If I can mess up a 15-solder board, surely a 400-solder one is going to explode. This might be exiting; If my apartment burns down in the process, I’m crying force majeure and buying it finished, like most people seem to.

[x_video_embed no_container=”true”][/x_video_embed]

What is remaining is everything else. I need to get all the metal parts — nuts bolts and washers — and don’t really know where to order them here in Sweden. I’m tempted to order from McMaster-Carr only because they have such a well designed site it makes me all weepy.

Hopefully, I’ll get my hands on the printed parts along with an extruder — Wade’s geared extruder — later this week when we’re going to play around with a MakerBot at KKV Elektronen, printing the boards with components at some point; It’ll be great to finally get a look at a 3D printer in action, and get a hang of the software to run it.

Speaking of which, I have to load the bootloader onto the ATMega 644-20 PU, and hope to use an old Arduino I have laying around somewhere. Sounds simple, but this would also require me to get a power supply for the rig. (12V pushing 15Amps should do it. The machine only requires 5Amps, but the heated bed requires an additional 8Amps, so there you go.) The power supply needs to be hooked up to the board, as does the Arduino, so I need to figure out what cables to use and make those, after which I get to hook computer to Arduino and let it do it’s programming magic.

The optostops need to have flags made for them, preferably out of soda cans, so that the stops can be engaged for calibration and safety. I need a couple of 5mm wide belts to drive the extruder and bed, and I can either buy them directly or split them myself from more standard widths. Having chosen to go with Wades extruder, I need to manufacture or buy a hot-end, the part of the printer where the plastic poops out, as well as the hot-bed onto which the pooping will happen. So tonight is “ordering shit online” night. That, and crying into a bottle.

So far, this has been a crash course in electronics, and the fact that I haven’t yet been electrocuted or blown a fuse is encouraging. I can almost feel my neural pathways adapt to all these Ohms, Amps and whatnots, and it’s nice to learn something new again.

Make: Excuse

You know how it is. One day when you’re cleaning up the terrible mess which is your apartment you find all the bills, reminders and last notices you were meaning to get to, and you yelp a little. Or like earlier today, when I couldn’t find my other glove — I had to leave in a hurry to get the voting done — and felt stupid for not having lost a single glove all winter, and waiting until spring before managing it.

Then again, I later found the glove further down in my man-purse, so perhaps the example isn’t valid. An example which is valid, is my realisation the other day that I have fuck-all to do all summer. Being self-employed, this means I got fuck-all income. So, I set myself to task with filling the weeks ahead with dilligent work and ambition, trying to see if any of my almost-competencies can be harnessed for cash and/or grants.

So far, I’ve managed to code a webpage for the Mateusz Saves project (I’ll post it here as soon as it stops blowing squid balls) and today we had an etching workshop at KKV. I managed to etch my first PCB ever, which was somewhat similar to doing my first photographic print, only more corrosive and smelling of chloride gas.

The purpose of todays exercise was to establish a standard process of making PCBs, and with just a few adjustments — and enthusiastic support for building a bubble tank from some quarters — it seems as if we succeeded. Watching paper dissolve from an ironed-on piece of copper and glass fibers might not be the most exciting thing to do, but it sure feels productive in a sciency-sort-of-way. The stuff we tried printing was the control board for a RepRap, which co-incidentally is what I need for the SUMU residency later this fall. I’m thinking of setting up a table in the kitchen and have the RepRap there, come odours or noxious fumes, allowing for the possibility of the following dialogue:

— Y’know, you really ought to get small holders for these chopsticks.
— Oh, why don’t you describe them to me and I’ll FUCKING PRINT THEM FOR YOU!

Because that is what every adult with a 3D printer dreams of saying, right?

Fabbing. Now in real time. Or in China. Or at your place.

A couple of weeks ago The Pirate Factory in Malmö demonstrated their RepRap. There’s Flickr pool of the event up here with a shaky video at the end of it. They’re using a spruced up version from Bits from Bytes which looks slightly less dingy than the RepRap usually does (also, it uses a more powerful microcontroller for driving the printer independently of a computer — apparently an SD card is enough) and judging from the pictures there was a bunch of people present. I wonder which of the pictures are going to be used in Swedish school-books in the future, as illustrations of the fabbing revolution and micro-production…

Speaking of which, Wired has an article up on the current state of how manufacturing companies have become accessible to anyone with a credit card, lowering the cost of admission into mass production to more or less zero. Atoms are the new bits is worth your time if you’re the least interested in these matters, or the future in general. It’s full of interesting links, like the one to alibaba.com, an enormous portal of Chinese manufacturers.

I wonder what the environmental costs will be of bespoke production; To some extent you’ll have less hit-and-miss toys occupying landfills, but this gain might well be offset by increased packaging and shipping, or some other corollary. Also, I wonder if these long-tail manufacturing plants will go global or if China and such countries will retain their head start; We in the west will only ever manufacture wars.

If intellectual properties will become impossible to enforce — something which isn’t certain, given the oppressive laws which are passed to counter transparency and openness — this would indeed shift not only the knowledge of how to do something but also the rational for the existence of a specific company. If you can download the plans for a SAAB, you just need someone to manufacture it. In the end, just as globalization has killed the connection between brand and production — after all, the cheap manufacturing plants exist exactly because of the Export Processing Zones in Vietnam and China — it might well kill the last remnant of Company with a capital “c,” the brand with an address.

These realizations are not lost on industry folk, but no-one wants to admit their own obsolescence, thus there’s no hurry to come up with new business models. The exceptions are Threadless of the world, but those start from the bottom up and don’t have to reinvent themselves; Let’s see how well Apple handles the transition — if at all.

Joren De Wachter has written a summation of the coming upheavals — The Return of the Public Domain — and it’s a text targeting those in the manufacturing & design industry. Even though he’s hopeful, or rather, not fearful, of the technological changes which will change intellectual property as we understand it, his text is very thin on the details of how companies will cope, and focus rather on the knowledge workers themselves. (Proffesional Idea Generators, he calls us, which might actually go as an acronym on my next business card)

However, there is also a very clear positive side to the new developments described above for Professional Idea Generators. The new business models that become necessary will clearly provide them with significant competitive advantages for doing business in an environment where the Public Domain is important. Knowledge and expertise, cost effectiveness, continued innovation and networking are key competences of Professional Idea Generators. This puts them in a very strong position in respect of the new developments.

The sentiment seems to be that “someone will still make money, if they just figure out how to add their own knowledge as a value which can be commodified.” As things stand, only those who make stuff will be needed, those who actually have the tools and raw material to manufacture something. Everyone else is part of the Public Domain. And not only figuratively as someone who designs webpages or new pens, but they themselves become part of the commons, and last time I checked there was a tragedy involved in the commons under any scarcity-driven economic model.

You’re going to need a special secret sauce, armed guards keeping it safe for long enough to sell it. And even then you’re either competing for a nieche audience which wants the exclusive, or your elbowing for space with other companies, competing on price.

And here’s a narrative which might seem familiar: Over at The Millions, there’s an interview with a guy who pirates books, and in the comments section some people are upset over a lack of morals. In ten years time, when your kids are printing modified pirated Nikes, maybe the kneejerk debate will be different, but I wouldn’t hold my breath. Home fabbing is killing Nike!